If I Can Do It …. Believe Me …. You Can Too !!!
Frenchies don't need a very large area to go potty.
However, you will be doing yourself and the dog a big favor if you will keep him/her on an area where there is no:
~ grass to cause skin allergies or
~ dirt to dig up hook worms
... or filth from the dirt causing the need for a bath every day.
Also, a fence within a fence will protect your baby from digging into the neighbor's yard before you know it, and from the neighbor's dog digging into your baby's area before you know it.
If your baby digs under your fence to try to get to the neighbor's dog, and breaks his/her neck ~ and you find him/her DEAD out there, you won't be the first person who thought it was OK to put the dog outside and go back in the house to take a shower !
Over the past 30 years, I have struggled with constant renovations to my dogs' outside areas.
~ I tried keeping a nice grass lawn = an impossibility unless that is ALL you do.
~ I tried "bark chips" = that was a disaster for many reasons including that they break down and you have to keep replacing them, you have a hard time picking up poop, they attract cockroachs and other bugs and wildlife, they are sharp, the dogs chew on them and you don't want that because they are "treated" with some chemicals, etc.
~ I tried bags of pebbles = here in Florida they just SINK into the ground and disappear over time.
~ I called Home Depot and asked them to send someone to put up a picket fence = nice job done, but there were faults I discovered later: I did not get a chance to "stain" the fence first and it was not weather treated; they put it right on the ground, so over time it rotted from the bottom up.
FINALLY FINALLY FINALLY I figured out how it should be done. I am a 72 year old woman who does not go to the gym, and I was able to do all this by myself. So my conclusion is: here are some pictures and directions and TAKE MY WORD FOR IT .. if I can do it, you can do it !!!
Before you get some of these items, find out if the Home Depot or Lowes or lumber yard where you shop can cut your purchases to size for you. Lowes won't cut a 4 x 4 post, so I have to get them at Home Depot. Home Depot did not sell gates, but now Lowes doesn't either. I just make my own. But I think only Home Depot has these little picket boards. I could not find them at Lowes last week.
I started my projects by buying 20 12x12 pavers every time I drove by Home Depot or Lowes. I then stacked them out in the back yard and just did a little at a time. I used to buy fence sections, but they are difficult to get home if you don't have a pick-up truck, so I found that I can also build my own fence with boards and fence slats.
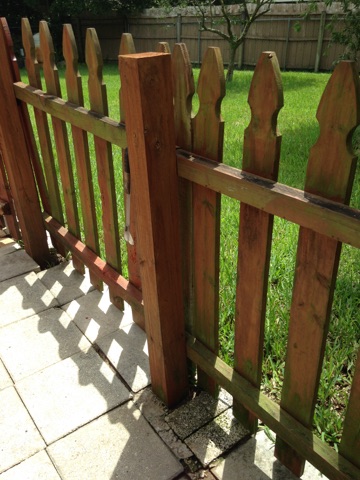
Below is a 4 x 4 weather treated post. It is too high because it is a 10 ft long post (cut in half = 5 ft)(1 ft in the ground and 4 ft high), so not my favorite. If I had to do the fence again, I would get an 8 ft long post. Cut in half, it will end up 1 foot in the ground and 3 ft high. I have found that you don't need to dig a really deep hole, and you don't need to pour concrete in the hole. The post may seem a bit wobbly when you first put it in, but if you water around it, that will help. And once you attach the fence to it, it will not be an issue. So dig a hole about a foot down, put the post in the ground, water around it and let it sit a day, if possible.
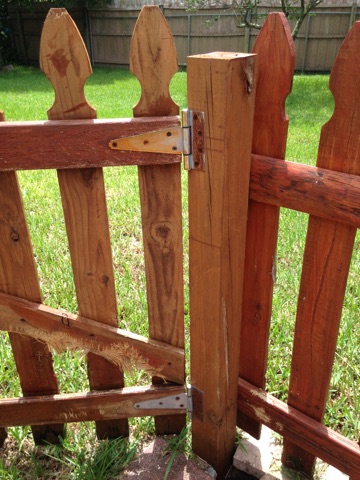
Of course, it is nice if you can buy a gate. But I think I actually made this one. If you don't have a table saw, and you present to Home Depot with the measurements, I am sure they will cut whatever you want. I think purchasing my table saw was one of the best things in life... so you might want to get one. But if you don't, a regular hand saw will work too. It is just a fence, not a work of art. My theory is, "If you can't see it from the road, it's just fine." So if you cut a little crooked, so what. Anyway, this picture also shows the hinges. And how to attach the gate to the post.
ps: you can see where someone named Semper Fi was chewing on my gate. He thinks he is a smarty pants. He doesn't know that humans can fix anything they want to.
Before you put the gate up, hold it in place and make sure it fits. You want it to open whichever way you like, and you want to make sure the latch is the right distance from the post. In this picture, the fence is on the outside of the posts (but I don't really like it that way) and the gate opens out onto the grass. I have no idea why I set it up that way. But it works.
Note, the bricks in this area are just on the ground next to each other... no concrete in between them.

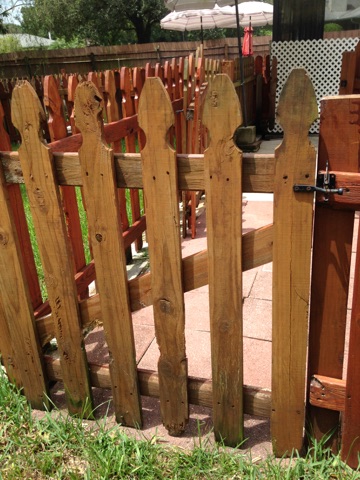
This is a view from the back patio. After I made the first area, I decided I needed another area, so I put in a gate, and then had to put another gate to the lawn area. You will notice I got a little creative with the gate area because the right side of the fence (which you can't see) is not perfectly perpendicular to the left, so I had to improvise.
Also notice that I put bricks down between the fence posts so the fence could rest on them, and NOT be sitting in the dirt ... I took a couple of spare fence slats and laid them down and put the fence on the slats, so that after it was screwed into the posts and I removed those slats, the fence is up off the bricks, too.
Then, in this yard, I SPACED the bricks and put concrete in between. I do NOT think that is the best idea, because if you just put the bricks down next to each other, pee will run into the cracks and disappear. You can also hose it off much easier
Also.... when you lay bricks down on top of grass, eventually the grass dies under there, especially if you spray anything trying to grow up in between ~ with weed killer.
So don't think there is a whole lot of "preparation" to laying the bricks down... just lay them down.

I bought these little umbrellas at K-Mart for about $28 ? each.
I open them in the morning so that they shade the concrete bricks during the day (so they don't get so hot), and I close them at night so that the evening/night wind and weather wont ruin them.
You can see I bought 1/2 blocks at Lowes and put the umbrellas in there with concrete, and then put them up on a couple of bricks to make them higher. I also took electric ties and secured them to the fence so the wind won't blow them over.
To put them in concrete: put a plastic bag down and put the 1/2 block on the bag. Take the umbrella apart (it separates about 1/2 way up). Put the bottom piece into the block and then pour dry concrete into the block. Then pour water on the concrete slowly. It is much easier than mixing the concrete with water and then putting it in. And it works just as well. It will solidify over night.
Note that it works the same way, if you want to put concrete in the 4x4 wooden post holes. Just put dry concret in there, and pour water on top. It is a lot less mess than mixing the concrete first.

At some point, I discovered that it is becoming harder and harder to just buy "picket" fence pieces (slats).
They still sell the whole picket fence "sections", but they are just too big for me to handle and transport.
If you go to the back of the "garden area" at Home Depot or Lowe's, you will find stacks of "slats".
So I bought a number of "privacy" fence slats, and cut them to the size I wanted. I used the left over pieces to over lap/put on top of/cover the spaces with.
It is just as good, and it makes it so that the dogs cannot see through the spaces to the next "dog area". So if you cannot find the little pickets, these work just as well.
And finally..... if you have a swimming pool, there is a VERY high likelihood you will lose your baby to a drowning. That is just the truth. If you think you are smarter than the average bear, that is nice. But remember: dog ownership is a live and learn experience, and it is ALWAYS at the expense of the dog.
Not much makes me more angry than someone putting on social media a film clip of their Bully playing in a lake, or the ocean, or a pool...... It makes people think that "it's OK"...... WELL IT'S NOT OK.... 99% of them drown in water.
If you think you will "teach him how to swim"
or "teach him where the stairs are"
or "teach him he can't go in without his life jacket"
or "teach the kids not to let him out unattended"
or "teach him not to try to go past that untrustworthy little fence thing you bought".....
go to Home Depot and buy a shovel,
cause you are gonna need it to bury your drowned baby....